How To Screen Record On Mac With Audio
Screen Recording tools are a popular go-to for any student, official, or even content creator. And by now, almost all of us have heard about this efficient tool. Whether you need to screen record the class for your friend who was unable to attend today or create a video tutorial for your customers, Screen Recorders are the way to go.

In the past few years, Screen Recorders have gained immense popularity for the different ways one can utilize them. Thus, many companies have come along to create modified versions of Screen Recorders by adding the latest features. However, like every other technological tool, there is no one-size-fits-all rule with Screen Recorders.
Even though some work perfectly fine incorporated with Windows or Android devices, they may not work the same with Mac devices. And that mainly has to do with the built-in configurations of Apple. Thus, one of the common queries among Apple users has been how to record the screen with the built-in or third-party applications on Mac? In this article, we dive in to discuss all the ways you can activate Screen Recorders on Mac with AUDIO.
What Is A Screen Recording Tool?
Screen Recording tools have been on the rise for the past couple of years. It is an easy to use efficient tool that captures activities happening on the screen. Its multipurpose functionality makes it an essential tool for any official or student to utilize. And the reason is simple videos are a mixture of audio and visual effects. It creates a bridge between the creator and their audience, retaining the audience's attention longer than any other medium.
That said, there are some technical differences when it comes to recording your screen on a Mac device, as opposed to Windows. Since Apple generally offers a lot of built-in options, you have more than one option to choose from to record your screen. However, you have to authorize it to add audio while you are recording your screen. Moreover, there are other third-party applications or software that you can incorporate with your Mac device.
Why Are Screen Recording Tools Used?
Videos are simpler to understand, and they deliver a range of emotions, which is why many companies take the help of videos to deliver their message to the customers. Not just that, videos are constantly being used to create educational videos online. And a screen recording tool makes the process of making these promotional and educational videos a lot simpler.
Forget about all of these and think of the number of times you end up recording your screen and sending it to your friends or colleagues. Be it something educational, work-related, or even just a video of your latest win at Valorant. Screen Recording tools come in handy in multiple ways, such as creating demo videos to increase customer retention, creating a presentation, recording the screen to train employees, and many more.
Ways You Can Record The Screen On Your Apple Device
Apple generally offers built-in applications to record the screen using internal audio. However, that may not be enough for creating professional videos. That is why, in spite of being Mac users, almost all creators use third-party apps to edit and add audio. Here, we have listed down and described all the ways you can Screen Record on your Mac device with audio.
The Screenshot Toolbar

First, let's talk about the toolbar method of Mac. It is basically a built-in configuration added to Mac-OS to capture your screen with audio.
As of 2019, Apple has introduced the feature of Screen Recording with audio with their Mac-OS Mojave onwards. Let's just say Apple understood the assignment and delivered just the functionality that users needed to record online classes, create presentations, etc.
With this feature, anyone can capture the screen and add audio, either by an audio amplifier or by deactivating the mic and adding internal sound. And if that was not enough, the number of steps to activate this feature is only four.
Step 1
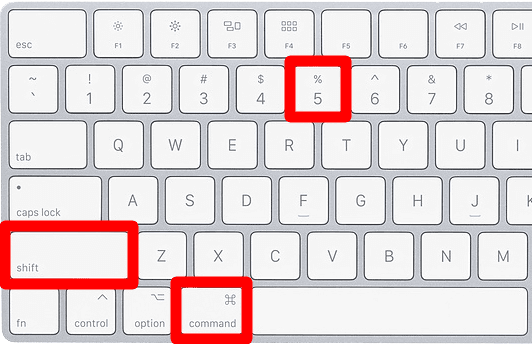
The first is to open the ScreenShot Toolbar. And for that, you need to press the buttons Shift, Command, and '5' together.

This step will launch all the keys needed to record the screen. The tools that will appear on the screen would basically help you to resize the screen, start the recording, and stop it. Once you activate the keys, you will see all onscreen controls, which you can either proceed on to capturing a still image or a video.
Step 2
The next step is to select the recording option. In this step, you have to determine whether you want to take a still image or create a video by recording the screen.
Step 3
In this step, you need to customize the tool and make necessary adjustments to your needs. A lot of the time, what we need is to capture a part of the screen only. And with this step, you can resize the screen and crop the screen that needs to get recorded or even adjust it to capture the entire screen. Moreover, you can adjust your audio from the Options section.
Step 4
This step is to adjust the start and the stop button quite literally. And with this, your laptop or PC will record and process the video for you to get your desired product.
Built-in Screen Recording Tool
QuickTime Player is the built-in Screen Recorder that Apple has added to their highly optimized Mac devices. This app allows you to record anything and everything that appears on your desktop screen.
With this app, you can cancel out the microphone and enable it to record the internal audio of the video playing on-screen. What Screenshot Toolbar does not offer you QuickTime delivers just that. It provides you with a range of options regarding your preferred choice for audio.
For instance, it allows you to record sound close to your monitor and add that to your video as a background sound. However, the quality of the audio may vary since it would largely depend on how well your speakers are able to capture that audio after you raise its volume.
That said, there are a few steps that you need to follow to launch this application and start recording your screen. For your convenience, we have broken down and described each process.
Step 1
In the first process, you need to go and launch QuickTime by searching it up in the utility bar of Mac. Once you find the application, you have to click the icon to get started with it.
Step 2
Once you have opened QuickTime, you need to go to the files section and select New Screen Recording from the menu. From here, you will either see the screen recording controls described above or different option layouts depending on the version of Mac you use.
Step 3
Here, you have to adjust the audio and select the type of audio input you want in your screen record. In order to modify this, you would need to go to the bottom section and select the audio recording option from there.
Step 4
Lastly, once you get done with all the alterations, you can then start your recording by pressing the red button in the middle of the screen recorder. And you will use this button to pause or stop the recording as you need. This way, you can use your Mac’s built-in screen recording app to create products from demo videos to presentations to many more.
Third-Party Apps
Now that we have discussed Mac's built-in Screen Recorders, the question remains, what to use if your Mac device is outdated and does not contain a built-in app like QuickTime, or what do you use when you want to create professional videos?
As mentioned earlier, you can utilize Screen Recording tools in multiple ways like content marketing to boost sales, demo videos to increase customer retention and return on investment, or even tutorials to train employees or videos to assess performance. Now, as screen recording tools have gained popularity, many software companies have come forward to create better and innovative Screen Recorders. And with that, there are many Screen Recorders in the market that work for different purposes.
That said, Mac's built-in Screen Recorders or features may not be enough for someone to create professional videos. Since professional videos require a lot of editing and modifications and higher quality work, professional content creators rely on different third-party Screen Recorders.
Moreover, the newer versions of Mac-OS have skipped the audio recording option within the QuickTime App. Thus, you will have to rely on other third-party apps to edit and add that audio effect.
VideoSends
And that is where apps like VideoSends come in, with their easy-to-use and efficient Screen Recording features.
VideoSends is an app that allows you to record the screen and share it in real-time with your teammates. So, this feature not only boosts the efficiency of the team but also helps them rectify mistakes by teamwork. Moreover, it provides its customers the benefit of adding noise cancellation to their videos.
With this third-party Screen Recorder, you get to tailor your videos to the way that you want with its additional features. Features such as visual effects, on-screen texts or citations, adding logos or pictures, built-in folder options, etc., allow you the flexibility of being creative with your professional videos. Moreover, its unlimited filing option enables you to store your files within the app to make further edits later on.
It is rather simple and easy to record and create videos with VideoSends. In order to get started with this app, you first need to launch this app after installing it from the app store. Once you launch the app, you will have to create an account using your email ID.
After you set up your account, the rest of it is just a cakewalk. All you have to do is click 'Create Video' on the top of the screen and then adjust the screen on your Mac device. Once you fix the screen space next, you will have to alter the audio. Now you can either add the audio on the screen or cancel it out entirely.
Since VideoSends is a user-friendly app, you do not need prior skills or expertise in using this application. Once you incorporate this third-party app with your Mac device, you will be able to create HD quality in no time. And that is where apps like VideoSends come in, with their easy-to-use and efficient Screen Recording features.
In Conclusion
Screen Recording tools are an effective tool in the realm of social media marketing or content marketing. And it does not stop there. There are plenty of potentialities that come with a Screen Recording tool.
With everything going online with the pandemic, you never know which skill may come to use when. From creating engaging assignments to expert insights, videos add value to your work and make the experience more enjoyable for the viewers. And that is why it is better to be in the know when it comes to any technological feature.
Looking for an easy and simple screen recording tool for your Apple device? You can give VideoSends a shot. Get started today to record, share, convert, and grow!